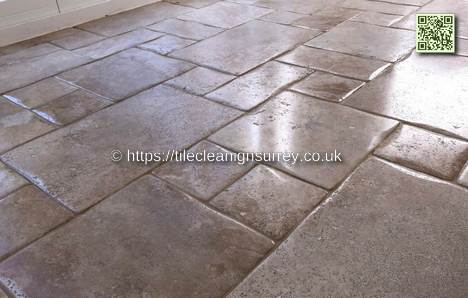
This case study showcases the restoration of travertine tiles in high-traffic areas of a property in Chessington, Surrey. As the years passed, the once-beautiful travertine had lost its luster, becoming dull, stained, and worn. To restore its original elegance, we undertook a comprehensive project that included deep cleaning, filling natural holes, and applying a protective sealant. The result was a beautifully revitalized, low-maintenance floor that regained its natural charm and received long-lasting protection for future durability.
Travertine Floor Cleaning In Chessington – Key Points
- Thorough Cleaning is Crucial: A rotary scrubbing machine, heavy-duty travertine cleaners, and hot water pressurized rinse equipment remove ingrained soil that regular mopping can’t tackle.
- Filling Holes Enhances Appearance and Durability: Addressing natural holes in the travertine improves its look and prevents future damage, ensuring the stone’s longevity.
- Sealing Simplifies Maintenance: A properly applied sealer acts as a protective barrier, making future cleaning easier and preventing stains from setting in.
- Consistent Maintenance is Essential: A regular maintenance routine, including periodic resealing, keeps the travertine pristine and preserves its beauty for years.
Client Background:
This project focused on restoring travertine tiles in a Chessington home, where the kitchen, hallway, and w/c floors had suffered significant wear over the years. The homeowner sought a solution to bring back the natural beauty of the travertine while ensuring the floors would be easy to maintain and durable enough to withstand daily use. The restoration process involved deep cleaning, filling natural holes, and applying a protective sealant to achieve a clean, resilient surface that highlights the rich colors of the travertine.
 Project Background:
The travertine tiles, admired for their natural beauty and durability, had been in place for over a decade. Over time, the tiles lost their smooth finish, with soil accumulating in the pits and voids. The grout was discoloured, diminishing the floor’s overall look. The project involved deep cleaning the tiles, filling the natural holes, and applying a protective sealer to restore the floor’s appearance and enhance its long-term resilience.
Challenges Encountered During the Project
- Deeply Embedded Dirt: Years of foot traffic had caused dirt to become ingrained in the natural pits and voids of the travertine, making it difficult to clean with standard methods.
- Natural Holes: Travertine tiles’ inherent holes and gaps trap the dirt and add to the floor’s worn appearance.
- Stained Grout: Over time, the grout between the tiles had become heavily stained, further diminishing the floor’s visual appeal.
- High Traffic Areas: The constant use of these spaces required a restoration approach that effectively revitalized the floor while minimizing disruption to the household.
Solution and Process:
Step 1: Assessment and Planning
The initial assessment identified the level of soiling and wear on the travertine tiles. Based on these findings, a plan was crafted to remove the ingrained dirt, fill the natural holes, and apply a protective sealer to restore the tiles and improve their durability.
Step 2: Cleaning Process
We prepared the work area by removing small pieces of furniture and clearing loose debris with brushing and vacuuming. After applying a diluted travertine cleaner and letting it soak for ten minutes, we used a rotary scrubbing machine with a medium-grade brush to remove the surface soil. We used hot-water rinse and capture equipment to tackle the dirt trapped in the holes and pits, effectively lifting the remaining soils and restoring the travertine’s clean surface.
Step 3: Filling Natural Holes
Step 4: Sealing the Floor
We applied a hybrid satin finish sealer with a roller, creating a mid-sheen look. This sealant formed a protective barrier against stains and dirt, making the floor easier to maintain. We ensured full coverage and a consistent finish during the sealing process.
Project Timeline:
We completed the project in two days, from assessment to final touches.
Project Results:
We restored the travertine to its original finish by removing ingrained soil and stains, revealing the natural colours of the tiles. The client expressed her delight with the results, commenting that the floor “looked as good as new”. The protective sealer now keeps the travertine low-maintenance and durable, preserving its beauty and functionality for the long term. This project turned a dull, worn floor into a revitalized, stunning surface.
Conclusion:
This travertine cleaning project in Chessington restored the tiles’ natural beauty, making them a durable and low-maintenance flooring solution for the homeowner. We significantly enhanced the floor’s appearance and extended its longevity through deep cleaning, precise filling, and effective sealing. This case study highlights the value of professional cleaning and maintenance for natural stone surfaces like travertine.
If your travertine floor needs cleaning or restoration, contact us today for a consultation. Our expert services will keep your natural stone surfaces beautiful and functional for years to come.
Frequently Asked Questions
How Long Does the Travertine Cleaning Process Take?
The travertine cleaning usually takes several hours, depending on the floor’s condition. Thorough cleaning techniques remove ingrained soil and prepare the tiles for sealing, which helps prolong their lifespan.
Is It Safe to Use DIY Cleaning Products on Travertine?
Homemade cleaning solutions on travertine can be risky due to potential chemical reactions that may harm the stone. For this reason, it’s safer to use pH-balanced cleaners specifically designed for natural stone to ensure effective and safe cleaning.
Can Travertine Floors Be Installed Over Existing Tile?
Yes, travertine floors can be installed over existing tiles. Proper installation requires assessing the underlying surface and potentially levelling it to ensure a stable, long-lasting finish.
What Is the Cost Range for Travertine Floor Cleaning Services?
The cost of travertine floor cleaning services typically ranges from £3 to £5 per square foot. The price varies depending on the cleaning methods, soiling, and the condition of the tiles.
How Often Should Travertine Floors Be Professionally Cleaned?
Travertine floors should be professionally cleaned every 12 to 18 months. Regular maintenance, including prompt spill management and periodic sealing, will help preserve the stone’s natural beauty and longevity.
The post Travertine Floor Cleaning In Chessington Surrey. Sponsored by: Travertine Cleaning Chessington
The Article Reviving Travertine Floors in Chessington, Surrey appeared first on https://fabritec.org
The Article Reviving Travertine Floors in Chessington, Surrey Was Found On https://limitsofstrategy.com

It’s fascinating to see how much a thorough restoration can breathe new life into travertine. I’ve always been a fan of natural stone floors, but I can imagine how quickly they can lose their appeal in high-traffic areas. The fact that something as simple as filling in those natural holes can improve both aesthetics and durability is intriguing.
It’s great to hear your thoughts on travertine restoration. You’re right—natural stone floors have a unique charm, but they do require a certain level of maintenance, especially in busy spaces. Filling in the holes not only enhances their appearance but also provides that extra layer of protection against wear and tear, which can be a game changer in high-traffic areas.
It’s great to hear that you appreciate the charm of natural stone floors. They really do have a unique character that brings warmth and a sense of authenticity to any space. One thing that often surprises people is how adaptable travertine can be, even in high-traffic areas. It’s a durable material, but like any natural stone, it does require a bit of care to keep it looking its best.
I completely agree with you about the charm of natural stone floors. There’s something about their texture and natural variations that really adds character to a space. I’ve noticed that even in homes with a more contemporary style, travertine can provide that warm, grounding element that ties everything together.
I’m glad you see the magic in natural stone floors. They really do have this rare ability to meld history and modernity. I mean, who would have thought that materials formed over thousands of years could feel so cozy in a sleek, minimalistic space? It’s like having a piece of nature just chilling with your contemporary décor, right?
I really appreciate that perspective. Natural stone floors do have this unique quality that really bridges the gap between eras. It’s fascinating to think about all the history embedded in those materials, isn’t it? They carry stories from the earth itself, while also fitting seamlessly into modern design.
I can definitely relate to what you’re saying about the charm of natural stone floors. The unique texture and variations really do bring an element of warmth that synthetic materials often lack. I’ve seen how travertine, in particular, can serve as a bridge between modern aesthetics and more traditional, rustic elements—it really gives a home a grounded feel.
You’ve hit the nail on the head with that observation about travertine. It really knows how to cozy up to a modern design, doesn’t it? Almost like that friend who shows up to a fancy party in a casual outfit but somehow seems right at home mingling with everyone.
You’ve really captured that vibe perfectly. Travertine does have this wonderful ability to blend seamlessly into a range of aesthetics, adding warmth without overwhelming the space. It’s impressive how a material can express such versatility while still feeling grounded.
I really appreciate that you noticed the versatility of travertine. It’s fascinating how this stone can play different roles in various designs, isn’t it? Whether it’s a rustic kitchen or a sleek modern bathroom, it just adapts without trying too hard. I love how it invites warmth into a space, creating that cozy feel while still feeling classy. Have you seen any recent projects or uses of travertine that caught your eye? Would love to hear more about what you think!
It really is remarkable how a detailed restoration can transform travertine into something that feels new again. I share your appreciation for natural stone floors – there’s something so earthy and timeless about them. You’re right about the challenges they face in high-traffic areas; maintaining that pristine look can be a bit of a balancing act.
I really appreciate your thoughts on travertine and natural stone floors. There’s something about the texture and warmth of stone that just connects you to the earth, doesn’t it? It’s like no matter how modern our homes get, those natural materials bring in a sense of grounding and authenticity.
I’m glad you found the article interesting! You’re right about how quickly natural stone floors can lose their appeal, especially in spaces that see a lot of foot traffic. Travertine, with its unique texture and beautiful variations, has so much potential but can also show wear over time.
It’s wonderful to hear your thoughts on natural stone floors. They really do have a unique charm that can enhance any space. You’re right—high-traffic areas can take a toll, but that’s what makes the restoration process so rewarding. Those natural holes can seem like imperfections, yet filling them opens up so many possibilities for both design and longevity.
I completely agree with you about the charm of natural stone floors. There’s something so timeless about them, isn’t there? It’s almost like each stone has its own story to tell. I’ve noticed that in places where they’ve been properly maintained or restored, the beauty really shines through.
You’re spot on about the stories behind each stone. The unique textures and colors can bring so much character to a space. I’ve always found that, when maintained well, natural stone can actually become a focal point in a room. It’s fascinating how the patterns and imperfections almost invite you to look closer, revealing layers of history. Plus, the aging process adds depth—over time, the floor can evolve, telling new stories with every scratch and scuff. Have you come across any particular styles or types of stone that really caught your eye?
I completely share your view about natural stone floors. There’s definitely a unique quality to them that feels almost grounding. The way light interacts with different textures and colors in the stone can really transform a space. It’s fascinating to think about the history behind each stone, how it was formed over time, and where it has traveled before finding its place in our homes.
I recently came across some insights about caring for travertine floors that really highlight how keeping them clean and sealed can enhance their natural beauty even more.
‘Travertine Floor Cleaning and Sealing Services in Chertsey’
https://blogpeeper.com/travertine-floor-cleaning-and-sealing-services-in-chertsey/.
I love your enthusiasm for natural stone floors! There’s something so captivating about how unique each piece of stone is, reflecting its journey through time and the Earth’s layers. The textures and colors really do bring a space to life, don’t they?
You hit the nail on the head about natural stone floors having that grounding vibe. It’s like each stone is a little storyteller, sharing its journey from deep within the earth to our living rooms—a little slice of geological history right under our feet.
I completely agree with you about the transformative power of a thorough restoration. Natural stone floors, especially travertine, have such a timeless quality, but you’re right—they can really lose their charm in busy areas. It’s fascinating how something as meticulous as filling in those natural holes can not only enhance the look but also extend the life of the flooring.
It’s fascinating to see how a focused restoration can breathe new life into something as timeless as travertine tiles. The attention to detail in deep cleaning and filling holes resonates with the idea that preservation often requires a blend of hard work and artistry. It reminds me of how we often overlook the value of small restorations in our own lives, whether that’s maintaining our surroundings or caring for relationships. Have you considered how these principles of restoration might apply to other areas, like furniture or even our personal well-being? I’ve found that sometimes giving attention to overlooked details can lead to unexpected beauty and longevity, both in our homes and in our lives. Looking forward to more insights from your ongoing projects!
You’ve touched on something really profound here. The concept of restoration truly goes beyond the physical act of cleaning or repairing tiles; it taps into a deeper philosophy about valuing and nurturing what we have. When I work on travertine tiles, the process often feels like a conversation – one where I listen to the surface, learn its history through its wear and tear, and respond in a way that respects that character while bringing it back to life.
Restoration is such a nuanced process, isn’t it? When you delve into something like travertine tiles, it’s easy to get lost in the technical aspects—cleaning, polishing, repairing—but there’s definitely an emotional narrative woven through it all. The transformation becomes more than just physical; it’s about breathing life back into something that holds history and character.
You’re right; restoration brings a unique blend of technical challenges and rich history. With travertine tiles, each scratch or discoloration often tells a story. When we rejuvenate these surfaces, we’re not just applying products or techniques; we’re connecting with the past and adding to its narrative.
It’s great to hear your thoughts on the restoration of travertine tiles. You’ve touched on something quite profound—the idea that meticulous effort and artistry shouldn’t just reside in large-scale projects, but can reshape the simplest elements of our lives, too. There’s a certain beauty in paying attention to the nuances, whether we’re reviving old tiles or nurturing connections with friends and family.